# MARCHON
---
## Managing Your Training
### How to Explore and Join New Training Programs
# How to Explore and Join New Training Programs
This guide shows you how to find and join different training programs in the MARCHON app. Following these steps allows you to easily switch your training focus to match your current fitness goals, whether it's for functional fitness, bodybuilding, or a specific event like Hyrox.
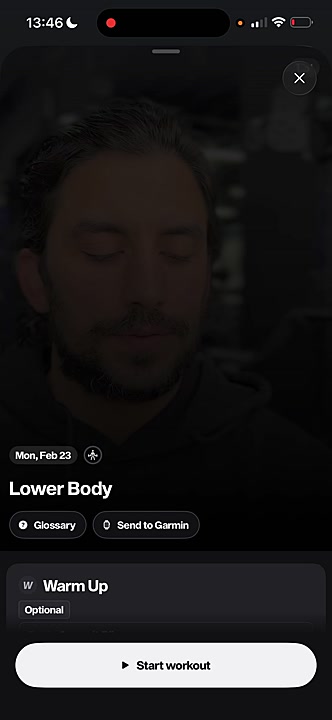
1. From the **Today** screen, tap the program title at the top of the screen. This will open a pop-up showing the programs you are currently a part of.
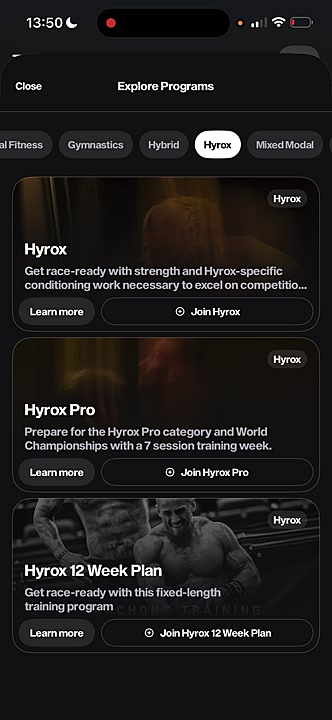
2. Tap the **Explore Programs** button at the bottom of the pop-up.
3. On the **Explore Programs** screen, scroll to browse through all available programs. You can also use the filter tabs at the top (e.g., **Bodybuilding**, **CrossFit**, **Hyrox**) to narrow your search.
4. Once you find a program that interests you, tap the **Join** button.
5. The app will automatically switch your active program. Your **Today** screen will now display the workouts for the new program you just joined.
### Tips
Your ability to join multiple programs depends on your subscription. Pro subscribers can join and switch between an unlimited number of programs at any time. Core subscribers can follow one program at a time and are limited to two program switches per month.
## Summary
This article explains how to browse, filter, and join new training programs. This feature gives you the flexibility to adapt your training to different goals and explore the full range of expert programming available in the MARCHON app.
## Related
- [How to rearrange your training week](/managing-your-training/how-to-explore-and-join-new-training-programs)
- [How to view your training plan](#article-2003)
- [How to start a workout and log your results](#article-2004)
---
### How to Switch Between Active Training Programs
# How to Switch Between Active Training Programs
If you have a Pro subscription, you can join and follow multiple training programs at the same time. This guide shows you how to quickly switch between your active programs directly from the Today screen. You must have a Pro subscription and have already joined at least two programs to follow these steps.
1. From the **Today** screen, tap the current **program title** located at the top of your screen.
2. In the **Programs** menu that appears, tap the program you wish to switch to. The Today screen will automatically update to display the selected program's workout for the day.
### Tips
With a Core subscription, you can only follow one program at a time. To switch, you must go to **Explore Programs** and join a new one, which will replace your current program. With a Pro subscription, you can join multiple programs and switch between them instantly using the method above.
## Summary
This article details the process for Pro subscribers to switch between their active training programs. By tapping the program title on the Today screen, you can instantly select a different program from your joined list, allowing for flexible and varied training.
## Related
- How to explore and join new programs
- How to rearrange your training week
- Understanding your training plan
---
### How to Rearrange Your Workout Week
# How to Rearrange Your Workout Week
Your training schedule should adapt to your life, not the other way around. This guide shows you how to easily rearrange your workout and rest days for the week to fit your personal schedule. You can make these changes directly from the Today screen.
1. From the **Today** screen, tap the **Rearrange Week** button located below the calendar.
2. In the **Rearrange Week** view, press and hold the workout or rest day you wish to move.
3. Drag the selected day to its new position in the schedule.
4. Once you are satisfied with the new layout, tap the **Save changes** button to confirm.
### Tip
If you make a mistake while rearranging, tap the **Reset** button at the bottom of the screen to revert to the original schedule before saving your changes.
## Summary
This article explains how to use the 'Rearrange Week' feature to customize your training schedule. By dragging and dropping workout or rest days, you can ensure your plan aligns with your availability, making it easier to stay consistent with your training.
## Related
- [How to log a workout](#article-4401)
- [How to view your training plan](#article-4402)
- [How to track your macros](#article-4403)
---
### How to View Your Overall Training Plan and Phases
# How to View Your Overall Training Plan and Phases
This guide will show you how to get a high-level overview of your entire training schedule. By viewing your plan, you can see past, current, and future training phases and the specific workouts scheduled for each week.
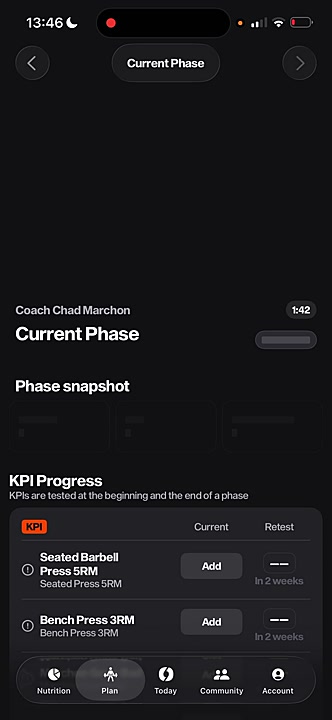
1. From the main **Today** screen, tap the **View Plan** button located at the top.
2. On the 'Plan' screen, you can see details of your current phase, including a phase snapshot and KPI progress. Swipe left or right to navigate between different training phases (e.g., 'Current Phase', 'Transition phase').
3. To view the workout schedule for different weeks within the selected phase, swipe left or right on the 'Program schedule' section.
4. Tap the back arrow in the top-left corner to return to the **Today** screen.
## Summary
This article explains how to navigate your training plan to see an overview of different phases and weekly schedules. This feature helps you understand the structure of your program and see what's coming up in your training.
## Related
- [How to start and log a workout](#article-6183)
- [How to rearrange your training week](#article-2947)
- [How to switch between different training programs](#article-1048)
---
## Completing a Workout
### How to Start and Navigate Your Daily Workout
# How to Start and Navigate Your Daily Workout
This guide shows you how to start your daily session, log your performance, and use in-app tools to customize your training. Following these steps will help you accurately track your progress and get the most out of every workout. No special tools or access are required to begin.
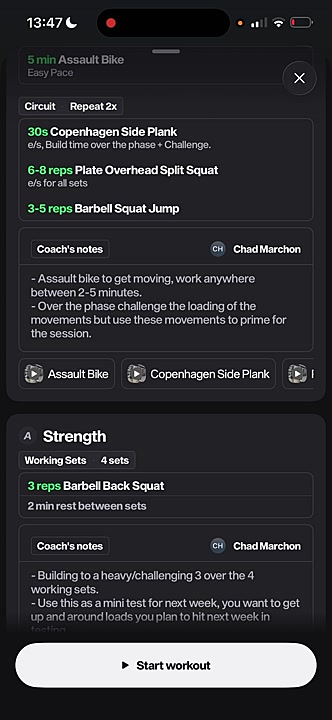
1. From the **Today** screen, you can see your scheduled workout. To begin the session, tap the **View Workout** button at the bottom of the screen.
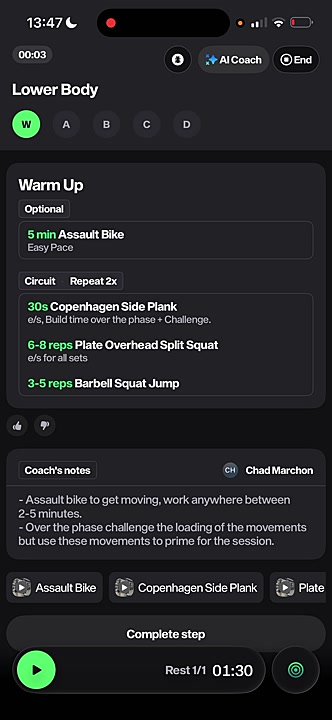
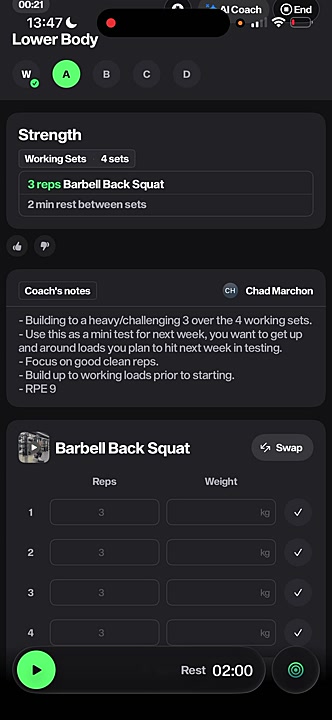
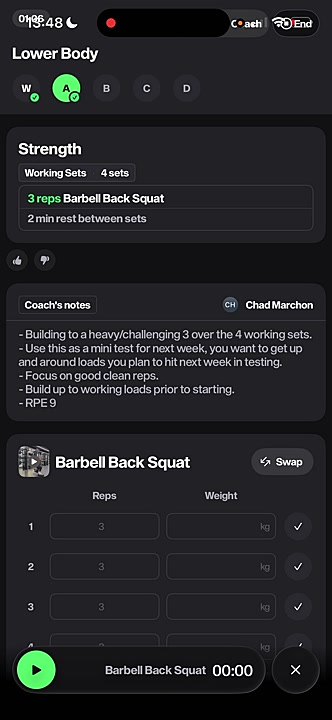
2. Once inside the workout, you can watch a video briefing from your coach at the top and scroll down to review all the exercises for the session. Each exercise includes a video demonstration and specific coach's notes.
3. As you complete each set, enter your reps and weight into the corresponding fields. The app automatically carries over the weight to the next set to save time. Tap the checkmark to log the set as complete.
4. Use the in-workout tools to enhance your session: **History**: View your past performance for that specific exercise.**% Calculator**: Calculate lifting percentages based on your saved rep maxes.**Notes**: Add personal notes about your performance or how you felt.
5. If you need to substitute an exercise due to injury or lack of equipment, tap the **Swap** button to see a list of alternatives. You can also use the **AI Coach** at the top of the screen to get a personalized recommendation.
6. Tap on an exercise to enter **Focus Mode**, which automatically starts your rest timer after you log a set. You can also swipe up from the bottom of the screen to access manual timers like **Stopwatch**, **Tabata**, or **EMOM**.
7. After finishing all sets for a section (e.g., Warm Up), tap the **Complete step** button to advance to the next part of your workout. A green checkmark will appear on the section's tab.
8. Once you've finished the entire workout, tap **Complete workout**. A summary screen will display your performance stats, including total time, reps, and volume. Tap **Done** to return to the home screen.
## Summary
This article explains how to start, log, and complete a daily workout in the Marchon app. It covers logging sets and reps, using in-workout tools like the percentage calculator and exercise swap feature, and utilizing timers to manage your session effectively.
## Related
- [How to use the AI Coach](#article-1357)
- [Understanding your training program](#article-2468)
- [How to log your meals](#article-9753)
---
### How to Log Reps and Weight for an Exercise
# How to Log Reps and Weight for an Exercise
Accurately tracking your performance is essential for making consistent progress and getting the most out of your training plan. This guide shows you how to log the repetitions (reps) and weight you lift for each set in your workout. You will need to begin a workout session to perform these actions.
1. Once you've started a workout, navigate to the exercise you wish to log.
2. Tap on the **Weight** input field for the first set.
3. Use the on-screen number pad to enter the weight you lifted.
4. Tap the checkmark icon to the right of the set to confirm it is complete. The app will automatically fill the same weight for the subsequent sets to save you time.
5. If your reps or weight differ on the next set, simply tap the corresponding **Reps** or **Weight** field to adjust the value.
6. Continue tapping the checkmark for each set you complete.
7. If you perform an extra set, tap the **+ Add Set** button below your completed sets and enter your performance details.
## Summary
This article demonstrates how to enter and log your completed reps and weight for any exercise within the app. By accurately recording your workout data, you ensure your progress is tracked effectively, which helps the app identify personal bests and provide tailored recommendations for future training.
## Related
- [How to Swap an Exercise in Your Workout](#article-4101)
- [How to Use the AI Coach for Workout Adjustments](#article-4102)
- [Using the Percentage Calculator](#article-4103)
---
### Use the in-app workout timers (Rest, EMOM, Tabata)
# Use the in-app workout timers (Rest, EMOM, Tabata)
The Marchon app includes a suite of built-in timers to help you manage your rest periods and follow specific workout protocols. These tools are accessible from within any active workout session to ensure you stay on track and maintain the right intensity.
## Accessing and Using the Timers
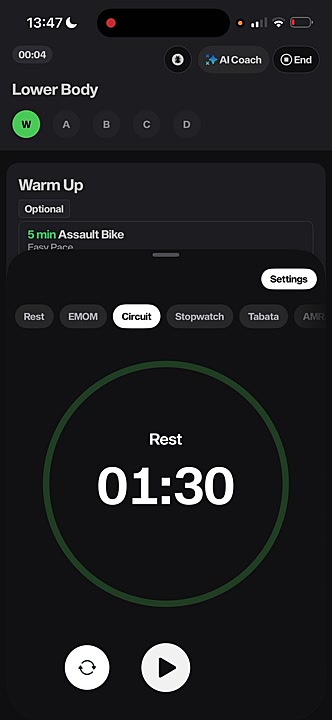
Once you've started a workout, you can access the timers by swiping up from the bottom of the screen. This action reveals a panel with several timer options to choose from.
The app features two primary ways to use timers: automatically through **Focus Mode** for prescribed sets, or by manually selecting a timer for custom use.
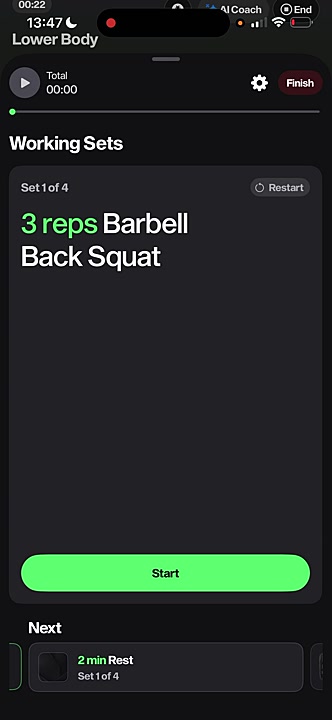
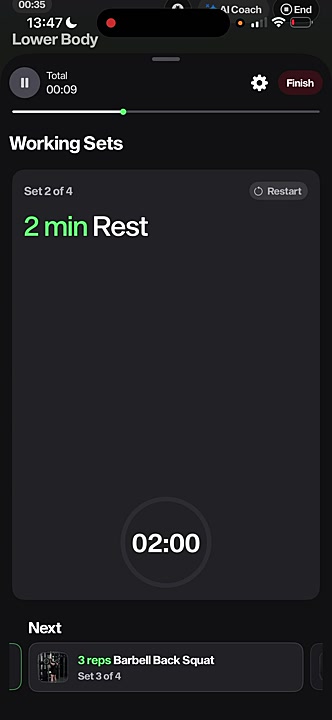
- **Automated Timers (Focus Mode):** For exercises with prescribed rest times, such as strength sets, you can enter **Focus Mode** by tapping the play icon. After completing a set and swiping to the next step, the app will automatically start the designated rest timer.
- **Manual Timers:** For conditioning pieces or if you need a custom timer, you can manually select one from the panel. Each timer can be configured by tapping the **Settings** button.
## Available Timer Types
The timer panel includes several standard and specialized timers to suit different training styles:
- **Rest:** A simple countdown timer ideal for manually timing your rest between sets.
- **EMOM (Every Minute On the Minute):** Counts down from 60 seconds repeatedly. It’s perfect for workouts where you perform an exercise at the start of each minute.
- **Circuit:** A versatile timer for circuit-style training, allowing you to set up multiple rounds of work and rest periods.
- **Stopwatch:** A standard count-up timer to track the total duration of an exercise or workout.
- **Tabata:** A high-intensity interval timer, pre-configured for Tabata-style workouts (e.g., 20 seconds of work followed by 10 seconds of rest).
- **AMRAP (As Many Reps/Rounds As Possible):** A countdown timer for a set duration. Your goal is to complete as much work as possible before the time runs out.
### Tips for Using the Timers
To get the most out of your workout, use the **Focus Mode** for strength portions to automate your rest periods, which helps maintain consistency and focus. For conditioning work, select the timer that best matches the workout's structure (e.g., **EMOM**, **Tabata**, or **AMRAP**) to accurately follow the intended stimulus.
## Summary
This article provides a guide to the in-app workout timers, including how to access them and the functions of each type. It covers both the automated rest timers in Focus Mode and the manual selection of timers like EMOM, Tabata, and a standard stopwatch. Using these tools helps you adhere to your workout's prescribed structure and timing for better results.
## Related
- [How to start and log a workout](#article-5501)
- [How to swap an exercise during a workout](#article-5502)
- [How to use the AI Coach for workout guidance](#article-5503)
---
### How to Use Focus Mode for Guided Sets and Rest
# How to Use Focus Mode for Guided Sets and Rest
Focus Mode is a powerful feature that guides you through your working sets and rest periods automatically. This guide shows you how to use Focus Mode to stay on track and let the app handle the timing, so you can concentrate on your lift. You'll need to have a workout open to follow these steps.
1. From your workout screen, navigate to the exercise you want to complete.
2. Swipe up on the exercise card to launch Focus Mode.
3. The screen will display your first set. Tap the green **Start** button to begin.
4. After completing your reps for the set, swipe the screen to the left. This will automatically start the prescribed rest timer.
5. Once the rest timer finishes, the app will display the next set. Repeat the process until all sets are completed.
6. After your final set, you will see a 'STEP COMPLETED' screen. Tap **Go to step B** (or the next letter) to move to the next part of your workout.
## Summary
This article explains how to use Focus Mode to automate your training sessions. By following these steps, you can seamlessly transition between work sets and rest periods with guided timers, allowing you to concentrate fully on your performance without manually managing a stopwatch.
## Related
- [Logging a Workout](#article-3521)
- [Swapping an Exercise](#article-1938)
- [Using the Timers](#article-2044)
---
### How to Swap an Exercise for an Alternative
# How to Swap an Exercise for an Alternative
This guide shows you how to swap an exercise in your workout plan. Whether you're dealing with an injury, lack specific equipment, or simply want to try a different movement, you can easily customize your session. You can swap exercises manually or get a personalized recommendation from the AI Coach.
## Method 1: Use the AI Coach to Swap an Exercise
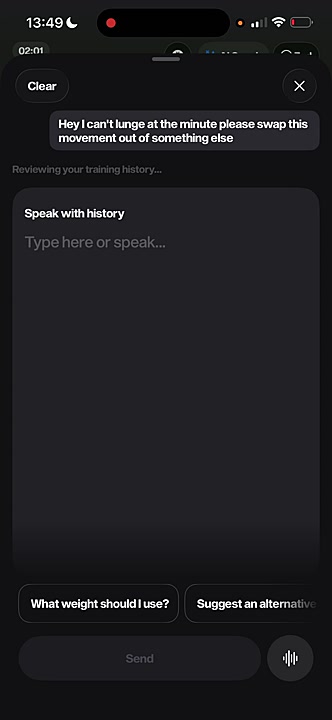
1. From the workout view, tap the **AI Coach** button located at the top of the screen.
2. Use the voice-to-text feature or type your request into the text box. Be specific about your needs, for example, "I can't lunge at the minute, please swap this movement out for something else."
3. The AI Coach will analyze your request and provide a text response with one or more suggested alternative exercises.
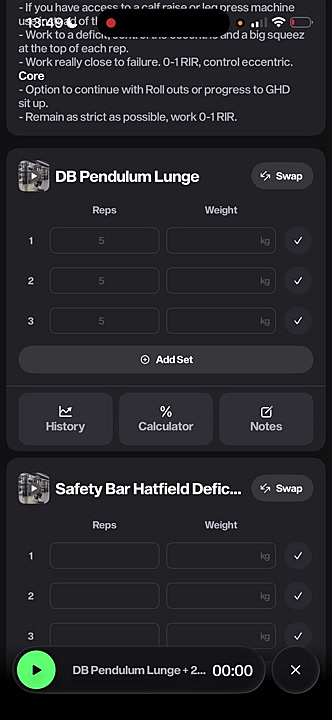
4. Below the text, tap the **Swap** button next to the alternative exercise you'd like to use. Your workout will be updated automatically.
## Method 2: Manually Swap an Exercise
1. In your workout, scroll to the exercise you want to replace.
2. Tap the **Swap** button on the right side of the exercise card.
3. A list of alternative exercises will appear. You can use the search bar or scroll through the list to find a suitable replacement.
4. Tap on the new exercise you've chosen. The original exercise in your workout will be replaced with your selection.
## Summary
This article explains how to substitute exercises within your training plan using two different methods. You can either use the AI Coach for intelligent, personalized suggestions based on your needs or manually select from a comprehensive list of alternatives. This feature provides the flexibility to adapt your workouts on the fly, ensuring you can always train effectively and safely.
## Related
- [How to Complete and Log a Workout](#article-301)
- [Getting Started with the AI Coach](#article-302)
- [How to Rearrange Your Training Week](#article-303)
---
### How to Watch Coach and Exercise Demonstration Videos
# How to Watch Coach and Exercise Demonstration Videos
This guide shows you how to watch both the coach's daily overview and individual exercise demonstration videos within the Marchon app. Following these steps will help you understand the focus of each workout and ensure you are performing movements with the correct technique.
1. From the home screen, navigate to the day of your workout and tap the **View Workout** button at the bottom.

2. On the workout screen, tap the **play** icon on the large video at the top. This will play the coach's overview, where they explain the session's structure and goals.
3. Scroll down to view the different sections of your workout, such as **Strength** or **Accessory**.
4. To see a demonstration of a specific exercise, tap the video thumbnail next to the exercise name (e.g., **Barbell Back Squat**). A pop-up video will play showing the correct form.
## Summary
This article explains how to access and play instructional videos within your daily workout. You can watch the coach's overview for session context and view individual exercise demonstrations to ensure proper form and technique, helping you get the most out of every training session.
## Related
- [How to log and complete a workout](#article-3957)
- [How to swap exercises and use the AI Coach](#article-3959)
- [How to view your training plan](#article-3954)
---
## Tracking Performance
### How to View and Log Your KPI Progress
# How to View and Log Your KPI Progress
This guide shows you how to view and log your Key Performance Indicator (KPI) progress. Tracking your KPIs is an excellent way to measure your performance improvements at the beginning and end of each training phase. To complete these steps, you will need to be following an active training program.
1. From the main **Today** screen, tap the **View Plan** button located near the top of the screen.
2. On your training phase overview screen, scroll down to the **KPI Progress** section.
3. Find the KPI you want to log (e.g., 'Back Squat 5RM') and tap the **Add** button next to it.
4. Enter your score in the pop-up window and save it. Your result will now be displayed, and you can compare it to your retest at the end of the phase.
## Summary
This article explains how to access your training plan overview and log scores for Key Performance Indicators (KPIs). Regularly updating your KPIs allows you to effectively track strength and conditioning gains throughout each training phase, providing clear benchmarks for your progress.
## Related
- [Understanding your training plan](#article-7156)
- [How to start and log a workout](#article-3382)
- [How to swap an exercise](#article-8812)
---
### How to Use the Percentage Calculator for Lifts
# How to Use the Percentage Calculator for Lifts
This guide shows you how to use the percentage calculator to find the right weight for your exercises. This tool is perfect for when your program prescribes lifts based on a percentage of your one-rep max (1RM). To use this feature, you must have previously logged a personal best (PB) for the exercise.
1. From the **Today** screen, tap **View Workout** to start your session.
2. Scroll to the exercise for which you want to calculate percentages.
3. Below the Reps and Weight entry fields, tap the **% Calculator** button.
4. The calculator will display your personal bests (e.g., **1RM**, **3RM**, **5RM**) at the top and a **% Chart** below with the corresponding weights.
5. To recalculate percentages based on a different personal best, tap another rep max at the top (e.g., **5RM**).
### Troubleshooting
If you see a "No 1RM found" message, it means you haven't logged a personal best for that specific exercise yet. To use the calculator, you must first log a set for the exercise during your workout or manually update your PBs in your profile.
## Summary
This article explains how to access and utilize the percentage calculator within a workout. This feature provides a detailed chart of weights based on your logged personal bests, helping you accurately follow percentage-based training protocols and select the appropriate load for your lifts.
## Related
- How to start and log a workout
- How to view and edit your personal bests (PBs)
- How to swap an exercise in your workout
---
### How to View Your Workout History for a Specific Exercise
# How to View Your Workout History for a Specific Exercise
Tracking your progress is key to getting stronger and fitter. This guide shows you how to view your performance history for any specific exercise within a workout. Seeing your past results helps you make informed decisions on what weights or times to aim for in your current session.
1. From the home screen, select a workout and tap **View Workout** to open it.
2. Scroll down to the specific exercise you want to review, such as the **Row Erg** in the Conditioning section.
3. Below the input fields for logging your results, tap the **History** button.
4. A panel will appear showing a log of your previous sessions for that exercise, including dates, weights, reps, and other relevant metrics.
## Summary
This article explains how to access your performance history for an individual exercise directly from the workout screen. By using the History button, you can quickly review past results to track your progress and set appropriate targets for your current training session.
## Related
- [How to start and log a workout](#article-9101)
- [How to swap an exercise](#article-3141)
- [How to use the AI Coach](#article-1121)
---
### How to Check Your Position on Exercise Leaderboards
# How to Check Your Position on Exercise Leaderboards
See how you stack up against the community by checking the leaderboards for specific exercises. This guide shows you how to find and filter leaderboards within your workouts to track your progress and stay motivated. Note that not all exercises will have a leaderboard.
1. From the home screen, select a workout and tap the **View Workout** button.
2. Scroll down to a strength or conditioning exercise within the workout.
3. Continue scrolling past the input fields for reps and weight to find the **Leaderboard** section.
4. To expand the view and see all scores, tap **View all scores**.
5. At the top of the full leaderboard screen, you can filter the results by tapping **Overall**, **Men**, or **Women**.
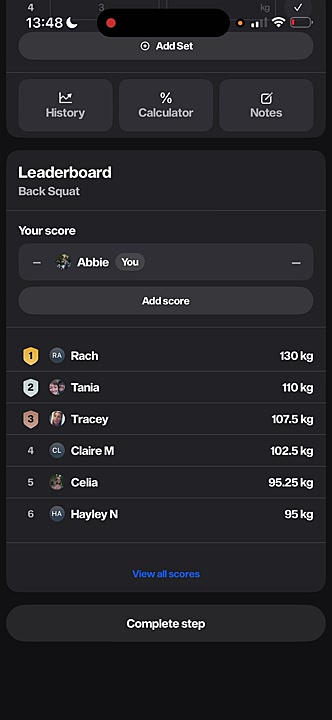
## Summary
This article explains how to access and view leaderboards for specific exercises. By following these steps, you can compare your performance with other members of the community, filter rankings, and track your competitive progress over time.
## Related
- How to start and log a workout
- How to track your KPIs
- Viewing your workout history
---
## Using the AI Coach
### How to Ask the AI Coach for Exercise Alternatives
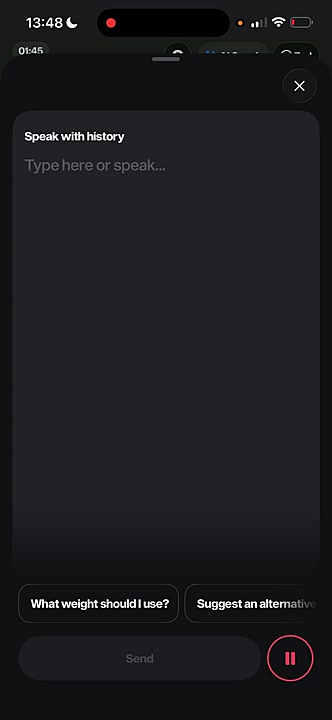
# How to Ask the AI Coach for Exercise Alternatives
If you're unable to perform a specific exercise due to injury, lack of equipment, or personal preference, the AI Coach can suggest and apply suitable alternatives. This guide will show you how to ask the AI Coach to swap an exercise within your workout. All you need is an active workout session.
1. From your workout screen, tap the **AI Coach** button at the top of the screen.
2. In the 'Speak with history' window, either type your request or tap the microphone icon to speak.
3. Clearly state which exercise you want to replace and, if possible, the reason. For example, say "Hey, I can't lunge at the minute. Please swap this movement out for something else."
4. The AI Coach will review your request and provide a text explanation with one or more suggested alternatives.
5. To accept a suggestion, tap the **Swap** button next to the proposed exercise. The original exercise in your workout will be replaced with the new one.
### Tips
If you prefer to choose an alternative yourself, you can also manually change an exercise. Simply scroll to the exercise in your workout and tap the **Swap** button next to its name to see a list of other options.
## Summary
This article explains how to use the AI Coach to request and implement exercise substitutions in your training plan. This feature allows for real-time workout adjustments, ensuring your session remains effective and safe, even when faced with equipment limitations or physical constraints. By personalizing your workout on the fly, you can maintain consistency and continue progressing toward your fitness goals.
## Related
- [What is the AI Coach?](/using-the-ai-coach/what-is-the-ai-coach)
- [How to manually swap an exercise](#article-6992)
- [How to log your workout](#article-6991)
---
### What is the AI Coach?
# What is the AI Coach?
The **AI Coach** is your intelligent, in-app assistant designed to personalize your training and nutrition tracking. It helps you adapt workouts on the fly and log meals effortlessly, ensuring your plan always fits your needs.
## What the AI Coach Is
The AI Coach is an interactive feature that uses advanced technology to understand your spoken or typed commands. Think of it as a personal trainer in your pocket, ready to assist you during your workout or when planning your meals. Its main functions include:
- **Workout Modifications:** If you can't perform an exercise due to an injury, lack of equipment, or just need a different challenge, the AI Coach can suggest a suitable alternative. It understands context, such as replacing a dynamic lunge with a more stable split squat.
- **Intelligent Nutrition Logging:** Instead of manually searching for and entering every food item, you can simply describe your meal. The AI Coach will identify the ingredients, calculate the calories and macros, and log it for you.
- **Answering Training Questions:** Ask questions about your program, specific exercises, or training principles to get instant, helpful advice.
## Why It Matters
The AI Coach makes your fitness plan truly dynamic and personal. It gives you the power to make real-time adjustments to your workouts, which is crucial for staying consistent and avoiding injury. If a machine is taken at the gym or you feel a twinge in your knee, you don't have to skip the exercise; you can ask for a safe and effective alternative.
For nutrition, this convenience is a game-changer. The friction of logging meals is one of the biggest hurdles to successful diet tracking. By allowing you to log food with a simple voice command, the AI Coach saves you time and makes it significantly easier to stay on track with your nutritional goals.
## How the AI Coach Works
Our AI Coach uses powerful natural language processing (NLP) to interpret your requests. When you ask for an exercise swap, it analyzes the movement and cross-references our extensive exercise library to find alternatives that target similar muscle groups. For food logging, it deconstructs your sentence, identifies food items and quantities, and matches them to our nutrition database to provide an accurate log.
## Summary
This article introduces the AI Coach, your personal in-app assistant for smart training and nutrition. You'll learn how it provides intelligent exercise substitutions based on your needs and simplifies meal tracking with voice-activated logging, making your fitness journey more adaptable and efficient.
## Related
- How to Swap an Exercise
- How to Track Your Nutrition
- How to Log a Workout
---
## Tracking Nutrition
### How to Set Up Your Nutrition Goals and Macro Targets
# How to Set Up Your Nutrition Goals and Macro Targets
This guide shows you how to set up your personal nutrition goals and macro targets within the Marchon app. By providing your body metrics and activity levels, the app can generate a tailored nutrition plan to support your training and help you achieve your goals. You will need to know your current weight and height to get started.
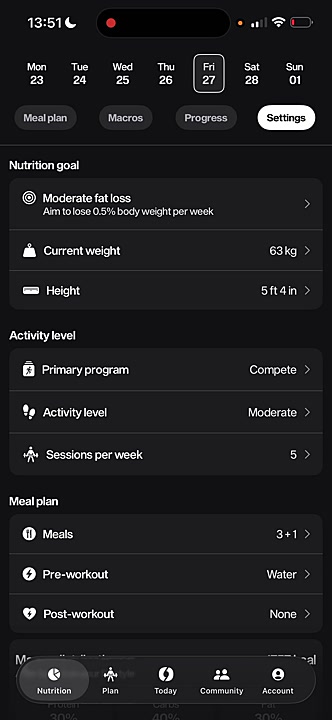
1. From the main navigation bar at the bottom of the screen, tap the **Nutrition** icon.
2. At the top of the Nutrition screen, tap the **Settings** tab.
3. Tap on **Nutrition goal** to select your primary objective. Options include **Aggressive fat loss**, **Moderate fat loss**, **Maintain**, and **Lean muscle gain**.
4. Update your personal metrics by tapping on **Current weight** and **Height** and entering your information.
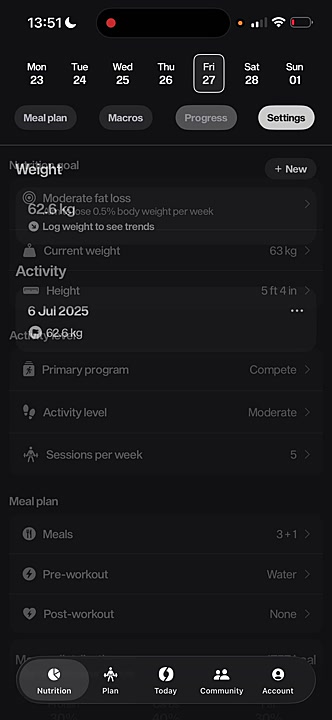
5. Under the **Activity level** section, set your **Primary program**, your non-exercise **Activity level** (based on daily steps), and the number of **Sessions per week** you intend to train. These settings are crucial for accurate calorie calculations.
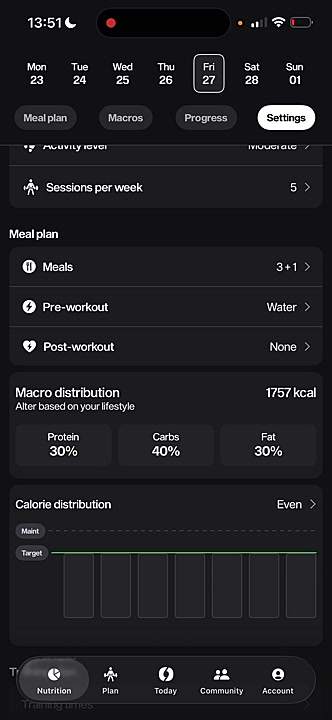
6. In the **Meal plan** section, tap on **Meals** to choose your preferred meal structure (e.g., **3 meals + 1 snack**). You can also set preferences for your **Pre-workout** and **Post-workout** nutrition.
7. Review and adjust your **Macro distribution**. Tap on the percentages for **Protein**, **Carbs**, and **Fat** to alter the distribution based on your lifestyle and preferences.
### Tips
Your daily calorie and macro targets will automatically recalculate whenever you update your goals, activity level, or body weight. For the most accurate recommendations, be sure to log your current weight regularly in the **Progress** tab.
## Summary
This article explains how to personalize your nutrition plan in the app. It covers setting your primary goal, inputting physical metrics, defining your activity level, and structuring your meal plan and macro distribution to create a customized nutrition strategy that aligns with your fitness journey.
## Related
- [How to log your food](#article-5403)
- [How to track your progress](#article-2891)
- [Understanding your macros](#article-7156)
---
### How to Log Meals Using Voice or Text
# How to Log Meals Using Voice or Text
This guide explains how to log your meals in the Marchon app using either voice commands or text input. Keeping an accurate food log is essential for tracking your progress and ensuring you stay on target with your nutritional goals.
1. From the bottom navigation bar, tap **Nutrition** to go to your meal plan.
2. Tap the **Log Food** button located at the bottom of the screen.
3. On the **Log food** screen, ensure **New meal** is selected. You can also log a previous meal by tapping the **Previous meals** tab.
4. To use voice logging, tap the red microphone icon and state your meal details clearly. For example, say "Two eggs, one bagel, 15 grams of butter."
5. To use text logging, tap inside the **Describe your meal...** box and type in the ingredients and quantities.
6. Review the automatically generated list of ingredients and their nutritional values. The app breaks down the calories, protein, carbs, and fat for you.
7. Once you confirm the details are correct, tap **Log Meal** to add it to your daily plan. Your macro and calorie totals for the day will update automatically.
### Tip for Accurate Logging
For the most accurate results with voice logging, speak clearly and be specific. State both the food item and its quantity (e.g., "150 grams of salmon" or "one medium banana"). The more detail you provide, the more precise the nutritional tracking will be.
## Summary
This article teaches you how to quickly and accurately log your food intake using the Marchon app's voice and text features. This process allows you to monitor your daily calories and macronutrients, helping you stay aligned with your fitness and nutrition goals.
## Related
- [Understanding Your Macros](#article-9501)
- [How to Set Your Nutrition Goals](#article-9502)
- [Viewing Your Weekly Progress](#article-9504)
---
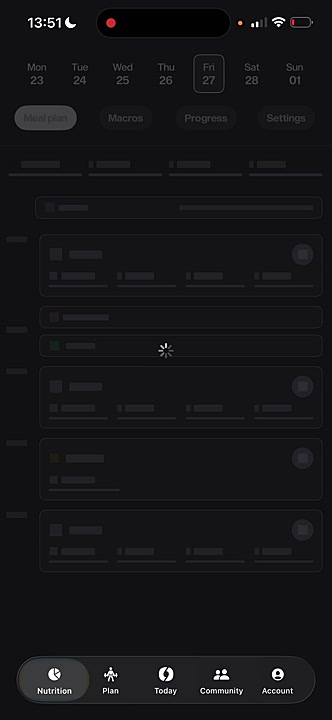
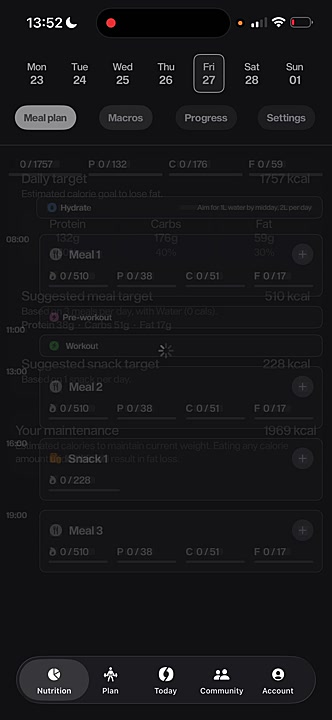
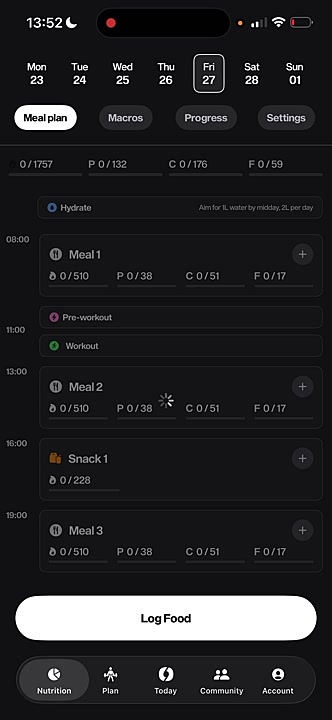
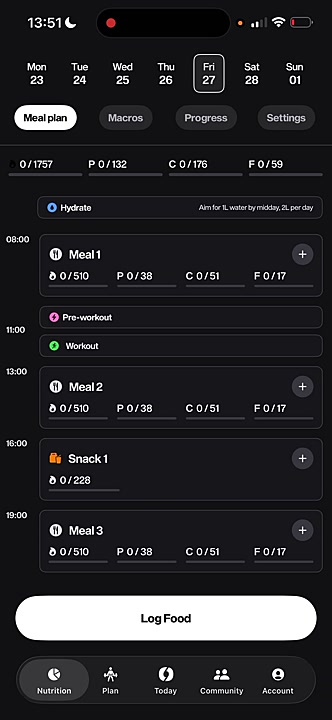
### View your daily meal plan
# View your daily meal plan
The Meal Plan feature, found in the Nutrition section of the app, provides a structured overview of your daily dietary targets. It is designed to help you align your food intake with your training goals. You will interact with this section daily to log your meals and monitor your macro consumption.
## The Meal Plan Tab
The **Meal plan** tab is your main dashboard for daily nutrition. It presents your day in a timeline format, showing scheduled meals, snacks, and workout blocks. This structure helps you visualize your energy intake around your training sessions.
- **Meal Cards:** Your day is broken down into cards for **Meal 1**, **Snack 1**, **Meal 2**, etc. Each card shows the target calories, protein (P), carbohydrates (C), and fat (F) for that specific meal.
- **Log Food Button:** Located at the bottom of the screen, this button allows you to add a new meal.
- **Plus (+) Icon:** Tap the plus icon on any meal card to log food for that specific mealtime.
- **Hydrate:** A reminder at the top to help you track your daily water intake.
## How to Log Your Food
The app uses natural language processing to make food logging quick and easy. You can simply type or speak what you ate, and the AI will calculate the nutritional information for you.
1. Tap the **Log Food** button or the `+` icon on a meal card.
2. In the **Describe your meal...** box, either type or use the microphone icon to state what you ate. Be specific with quantities for the best results (e.g., "two eggs, one bagel, 15 grams of butter").
3. The app will process your entry and display a detailed breakdown of the ingredients, calories, and macros.
4. Review the details for accuracy and tap **Log meal**. Your meal plan will update to reflect the logged food.
## Understanding the Macros Tab
Next to the **Meal plan** tab, you'll find the **Macros** tab. This provides a high-level summary of your nutritional targets for the day, which are determined by your inputs in the **Settings** tab.
- **Daily target:** Your total estimated calorie goal to achieve your selected objective (e.g., fat loss, muscle gain).
- **Macronutrient Breakdown:** Shows your daily targets for Protein, Carbs, and Fat in grams and as a percentage of your total calories.
- **Suggested meal/snack target:** Provides a calorie guideline for each meal and snack to help you stay on track throughout the day.
- **Your maintenance:** The estimated calories required to maintain your current weight. This helps you understand the size of your deficit or surplus.
### Tips for Using This Section
For the most accurate tracking, be as specific as possible when describing your meals. To adjust your targets, meal structure, or activity level, navigate to the **Settings** tab within the Nutrition section.
## Summary
This article explains how to use the Meal Plan feature to view your daily nutritional targets and log your food intake. By leveraging the timeline view, natural language food logging, and macro overview, you can effectively manage your diet to support your fitness journey. The key functions covered include viewing meal-specific targets, logging food via text or voice, and understanding your overall daily macro goals.
## Related
- [Set up your nutrition goals](#article-5822)
- [How to track your progress](#article-4815)
- [Switching between programs](#article-1937)
---
### How to Track Your Weight Over Time
# How to Track Your Weight Over Time
This guide explains how to track your body weight in the Marchon app. Regularly logging your weight helps you monitor your progress and see trends over time, which is essential for reaching your fitness and nutrition goals.
1. From the bottom navigation bar, tap the **Nutrition** icon.
2. At the top of the screen, select the **Progress** tab.
3. In the **Weight** section, tap the **+ New** button.
4. Enter your current weight in the field provided.
5. Tap **Save** to add the entry to your activity log.
## Summary
This article demonstrates the simple process of logging your body weight within the Marchon app. By navigating to the Nutrition and Progress tabs, you can add new weight entries, which are then charted to provide a clear visual of your progress over your fitness journey.
## Related
- [How to log a meal](#article-4003)
- [Understanding your macros](#article-4001)
- [How to adjust your nutrition goals](#article-4004)
---
## Community and Account
### How to Use the Community Locker Room to Chat with Coaches and Members
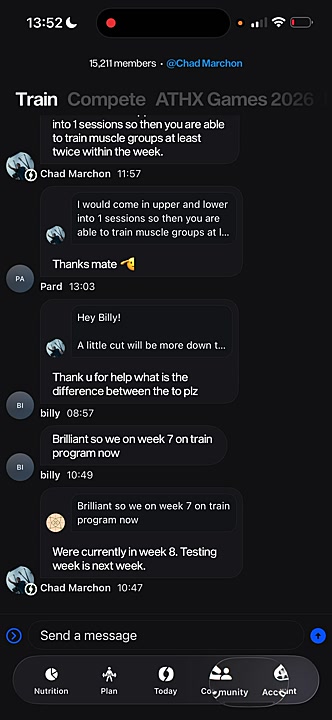
# How to Use the Community Locker Room to Chat with Coaches and Members
The community locker room is a great place to connect with other members and get answers directly from your coaches. This guide will show you how to navigate to the community chats and post a message.
1. From the bottom navigation bar, tap the **Community** tab.
2. Select the program-specific locker room you wish to enter from the top of the screen, such as **Train** or **Compete**.
3. Tap the **Send a message** field at the bottom of the screen.
4. Type your message. To get a coach's attention, type '@' followed by their name to tag them directly in your message.
5. Tap the **send** icon to post your message in the chat.
### Tips
Tagging a coach (e.g., @Chad Marchon) in your message sends them a notification, which can help you get a faster response to your question.
## Summary
This article explains how to use the community locker room feature. It provides step-by-step instructions on accessing different program chats, posting messages, and tagging coaches or members to foster interaction and get support.
## Related
- How to get started with Marchon
- How to use the AI Coach
- How to swap an exercise
---
### How to Connect Your Garmin or Apple Health Account
# How to Connect Your Garmin or Apple Health Account
This guide shows you how to connect your Garmin or Apple Health account to the Marchon app. Syncing your data allows the app to pull in health metrics like heart rate, sleep, and activity, providing you with deeper training insights. You will need your login credentials for the account you wish to connect.
1. From the main screen, tap your **profile icon** in the top-right corner to open your account settings.
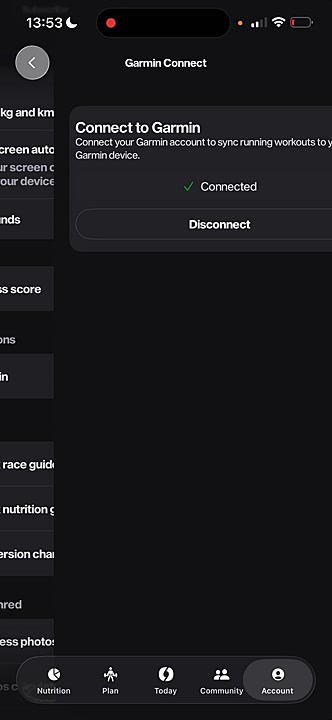
2. To connect your Garmin device, scroll down to the **Connections** section and tap **Garmin**.
3. To sync with Apple Health, scroll to the **Health Data** section and tap **Apple Health Access**.
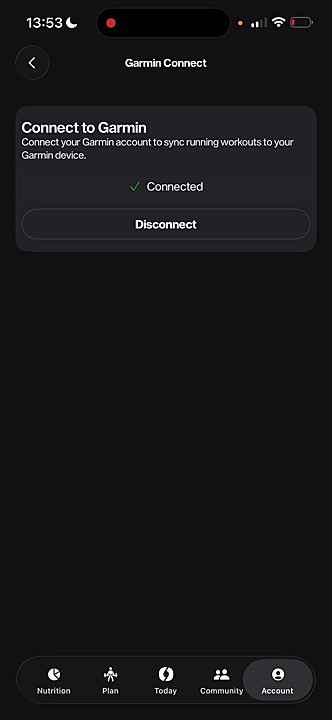
4. Tap the **Connect** button. You will be redirected to the official sign-in page for Garmin or Apple Health.
5. Enter your login credentials and authorize Marchon to access your health and workout data by following the on-screen prompts.
6. After successful authorization, you will be returned to the app. The connection status will now show as **Connected**.
## Summary
This article explains how to link your Garmin or Apple Health accounts with the Marchon app. By syncing these external services, you can automatically import your health and activity data, which helps the app provide more personalized fitness scores and training recommendations.
## Related
- [How to get started with the Marchon App](#article-1001)
- [How to use the Workout screen](#article-1002)
- [Understanding your KPIs and Plan](#article-1003)
---
### How to Edit Your Profile and Manage App Settings
# How to Edit Your Profile and Manage App Settings
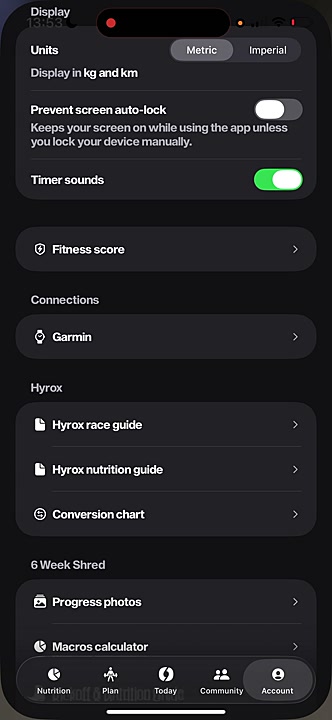
This guide shows you how to customize your Marchon Training app experience. You will learn how to edit your personal profile information, adjust display units, manage device connections, and access other important settings to tailor the app to your preferences.
1. From any of the main navigation tabs (**Today**, **Plan**, **Nutrition**, or **Community**), tap your **profile icon** in the top right corner to open the **Settings** screen.
2. To update your name, gender, or profile picture, tap the **Edit profile** button.
3. In the **Edit profile** screen, tap the **camera icon** to change your photo, update your details in the fields provided, and tap **Save**.
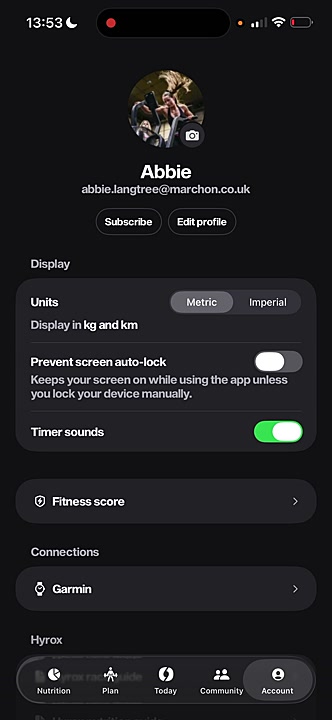
4. Under the **Display** section, choose your preferred measurement system by tapping **Metric** (kg/km) or **Imperial** (lbs/mi).
5. Use the toggles to turn **Prevent screen auto-lock** and **Timer sounds** on or off based on your preferences during a workout.

6. To sync data from your fitness watch, scroll to the **Connections** section and tap **Garmin**. Follow the on-screen instructions to authorize the connection.
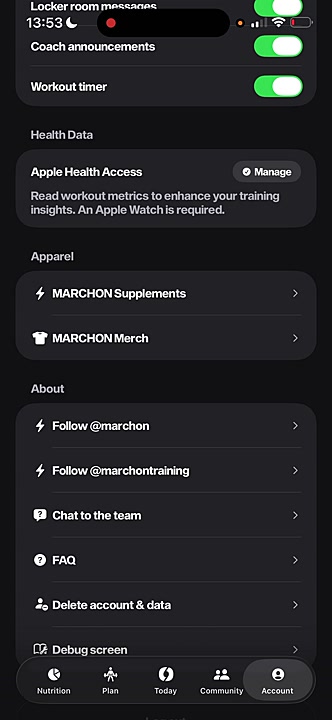
7. Access helpful resources for your specific programs, such as the **Hyrox race guide** or **Progress photos** for shred challenges, by scrolling further down the settings page.
8. If you need assistance, use the links in the **About** section to **Chat to the team**, read the **FAQ**, or follow Marchon on social media.
9. To permanently remove your account and all associated data, tap **Delete account & data** and follow the confirmation steps.
## Summary
This article explains how to manage your Marchon Training profile and app settings. It covers updating personal information, customizing display units and sounds, connecting external devices like Garmin, and accessing support resources. Properly configuring these settings ensures a personalized and seamless training experience.
## Related
- [Getting started with the Marchon app](#article-2468)
- [How to track your workout](#article-1357)
- [How to use the Nutrition feature](#article-9753)
---